

Are you looking to build a crowd-sourced database, much like Wikipedia? We’ll be breaking down how to do that with no code, using Bubble. With the aid of visual programming, you can build your own information database. We’ll go over the basics of not only Bubble, but also visual programming, basic data structures, workflows, and features used.
Introduction:
First things first, make sure you sign up for a Bubble account to get started. If you’re familiar with Bubble, great! If you are new to Bubble , there are the Crash Course videos and Bubble’s introductory lessons that will help familiarize you with the program step-by-step.
If you’re looking for other instructions on how to build clones of specific websites, you can check out Bubble’s other How to Build Guides. These walkthroughs include ways to build MVP’s for clones of Shopify, LinkedIn, Medium, and Twitter among others.
Designing an interface in Bubble:
As with the case with many other Bubble products, you can choose to wireframe your design or build the fields within your database.
Wikipedia is comprised of a few core pages that you’ll want to make sure that you’re including regardless of the method you choose to get started with:
- Registration Page: How users can register to become a contributor
- Home Page: Allows users to search for a topic
- Contribution Page: Where users can create new contributions to the knowledge repository
- Article Page: Where the full content of each topic is displayed
- Edit page: Where users can make changes to existing articles
Below is a sample interface for this page:

This tutorial uses one of Bubble’s key features, which is the ability to send data between pages. This will allow you to make a sort of “generic” page, and then display relevant content from the database when required.
For this tutorial, you’ll only be creating one page to host your articles. We’ll then work through the necessary logic to display only the content that’s needed.
Create your data types:
Let’s start assembling the database for our Wikipedia clone to power the application. This database will give us the fields needed to connect the workflows behind the product. We’ll be creating two primary data types: user and articles.
Protip: Split the larger items of your database into separate data types to increase your application’s speed when you only need to display certain parts of your data in preview.
Creating the User data type (pre-existing in Bubble):
Starting by clicking on the `Data` tab. In Data types, add in the following fields:
- Articles - Published - be sure to select the list function
- Username (text)
- Photo (image)

Creating the Article Content data type:
In the Data tab’s Data types section, add in the following fields:
- Main Content (text)
- History (text)
- References (text)

Link your workflows
Wonderful! You’ve created the data sets that will power your Wikipedia clone. Let’s start making it functional at this point. Bubble uses workflows to power apps on its platform.
Create user accounts
We’ll start with the logic that enables a user to create a new contributor profile. Bubble has a login/signup element already created in their page dropdown. Through selecting that you can select a new Signup/Login Popup.


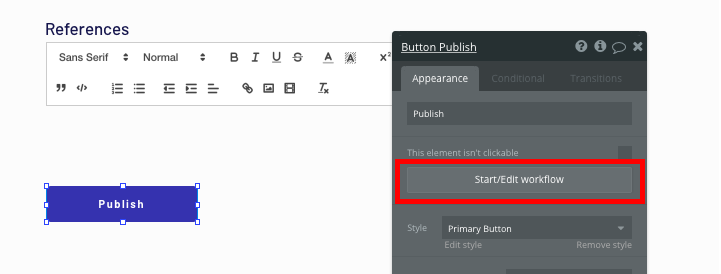
Click on the `Sign Up` button, then click `Start/Edit workflow`.
The following workflow will be shown: Add action > `Sign the User Up`
From there, you’ll match the input fields with elements needed to create a user profile.

Once this is complete, you’ll add the username field to the current user.
Click to `add an action` slide down to `data (things)` and select, `make changes to thing…`
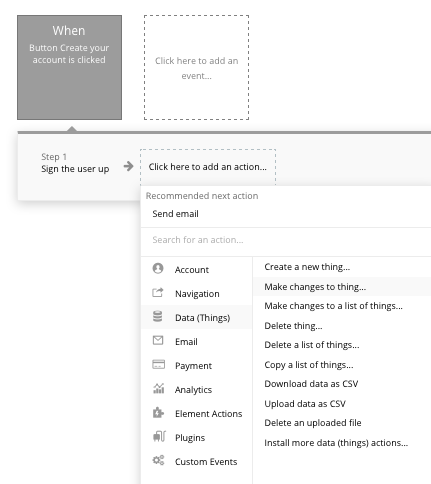
From there, adjust the `current user`, adding their profile from the input on the on-page username field

Your new user profile has now been added to the platform! If you want to take it a step further, go ahead and have them send a confirmation email.
Create new article
Next up: we’ll be creating a workflow that will allow users to create and publish pages on their own areas of expertise. It will be similar to the same structure of creating a user account.
First off - start by creating a new page, and adding the following input elements as listed below in the example interface:

We’ll then create a workflow around what happens when the `publish` button is created to upload these inputs into your database.
This workflow will create a new thing, and we’ll link back to the article content type we created early on in this tutorial

First, create the article content type, then link to the article itself.

You’ll then create a new additional step to create the full article.

By linking this, you are making sure that your data is integrated across your platform.
Working with Dynamic Content
As you get more users on your Wikipedia clone creating and contributing content, you’ll need to create a space where you can display this content.
On this page, you can start configuring the content type to be an article. This will tell Bubble where to easily pull and send the corresponding data to the corresponding page.

Next, add dynamic content into the fields that display the info from a unique article:

Logging and Updating Contributions to an article
You’ll then have to create and log contributions to the page.
Starting on the Article page created, add an `edit` selection in the header menu. Then, create a condition to allow only registered community members to make changes to articles.
Using the conditions feature, we’ll recognize when the current user isn’t logged in, and configure the element to not be visible.

Next, create a new page where people can review and make changes to the existing article. For ease, go ahead and just duplicate your existing create page.
Then, build a navigation event that sends users to the edit page when the edit text is clicked.

Then, send data from the current pages article.

From the edit page, update the page type to be an article. This will allow the Bubble editor to recognize the data sent through our workflow.

Now, when you add initial content into the input elements, it will allow them to automatically display the current version of the article within relevant fields.

This last change will allow for a contributor to make edits to the existing content and create a workflow that updates when the update button is clicked.

This workflow is similar to how you’d create an article, but rather changes the initial content of the current pages article.

Starting from the top – we’ll kick things off by updating the articles content and then reflecting the article itself.

Adding a search function
Naturally, you wouldn’t just want to just create an app where people can’t sort through what is posted on there.
Adding a search box will allow you to index all current topics.

Set up the search fields as topic titles, and your search bar will index all the different entries and offer suggestions as they type.
To make these searches send a user to the relevant article page, navigate to the workflow editor, and create an event that is triggered when the input value is changed.

Create a navigation event, with the destination page as your article page, and send the data source of the search box’s current value.

At this point, you can add in additional features such as: morecontent fields for each article or lists of related articles at the end of the page.
And there you have it! The basics of an open-source contributed encyclopedia like Wikipedia! It’s never been easier to build something incredible without having to code.
.png)
